Installation
Setup Repository and Environment
A. Installation with uv project management (recommended)
# For Linux and macOS
curl -LsSf https://astral.sh/uv/install.sh | sh

# For Windows (PowerShell)
powershell -ExecutionPolicy ByPass -c "irm https://astral.sh/uv/install.ps1 | iex"
pyproject.toml file in the root directory of the repository:uv sync
That’s it. If you use uv you can run all files with the uv run command as shown in later examples without additional need
to care about the virtual environments.
B. Installation with python virtual environments
Alternatively, you can also use virtual environments in python. If you have installed the required Python version (Python3.12) on your system. You can create it with the following command:
python3.12 -m venv venv
If you don’t have the correct python version, you can also use pyenv or virtualenv to use Python 3.12.
Next, you can activate the environment with:
Linux: source venv/bin/activate
Windows: venv/Scripts/activate
After activating the virtual environment, install the required packages:
pip install -r requirements.txt
Database Configuration
Create your database
Install PostgreSQL on your machine and make sure to keep “Stack Builder” checked if you are using an installer.
Install PostGIS. If you installed Stack Builder use it to install PostGIS.
GDAL is required for some geo-transformations. Ensure it is installed on your system. (e.g. for Ubuntu 24.04:
sudo apt install gdal-bin).Create your database with the appropriate configuration (dbname, user, password, host, port).
Create a
.envfile in the root directory of the repository with these configurations or adjust the connections parameters in theconfig_data.py.Your configurations might might look like this:
# PYLOVO Database
DBNAME = "pylovo_db"
USER = "postgres"
HOST = "localhost"
PORT = "5432"
PASSWORD = "yourpassword"
TARGET_SCHEMA = "pylovo" # optional, default is "public"
Input data
A. Using file-based raw data
The minimum data requirements for the raw_data directory are described below.
Some larger data files, which you can request from the maintainers at ENS, are not included in the repository due to their size (an online source will be available soon):
Building shapefiles (
res_<ags> and oth_<ags>) in thebuildingsdirectoryStreet SQL data (
ways_public_2po_4pgr.sql) in thewaysdirectoryThe postcode data (
postcode.csv) for Germany including the geometries in theraw_datadirectory
Other required data files that are already included in the raw_data directory of the repository:
transformer_data/substations_bayern.geojsonconsumer_categories.csvequipment_data.csv
B. Using InfDB data for buildings and ways (Recommended)
To do so, setup the fully dockerized InfDB from the corresponding GitHub repository
Make sure to also run the processor in your InfDB instance. For more information check out src/services/processor/Readme.md in the InfDB repository.
main_constructor.py script to initialize the pylovo database set the USE_INFDB: True in theconfig_data.yaml file.
| Next, the connection configurations set in the InfDB have to be added in the pylovo repository as
well: add the InfDB configuration to your .env file below the pylovo configurations:
# PYLOVO Database
DBNAME = "pylovo_db"
USER = "postgres"
HOST = "localhost"
PORT = "5432"
PASSWORD = "yourpassword"
TARGET_SCHEMA = "pylovo" # optional, default is "public"

# InfDB Database (Input Data)
INFDB_DBNAME="citydb"               # replace
INFDB_USER="citydb_user"            # replace
INFDB_HOST="00.000.00.000"          # replace
INFDB_PORT=5432                     # replace
INFDB_PASSWORD="citydb_password"    # replace
INFDB_SOURCE_SCHEMA="pylovo_input"  # InfDB processor puts relevant tables into "pylovo_input" schema
Note
If you want to keept it simple, you can also add the pylovo database as schema to the InfDB database by setting the same connection parameters and a
TARGET_SCHEMA such as pylovo in the .env file.
Load raw data to the database
The main_constructor.py script initializes and populates the pylovo database. Run:
uv run python -m runme.main_constructor
Warning
This script should only be used when a new database is required, as it will overwrite existing tables in your database. Use caution when running this script in production environments.
Below is a detailed outline of its functionality:
Database Initialization A new database is created and initialized using the class
SyngridDatabaseConstructor. This includes the addition of required PostGIS and pgRouting extensions to your database.Importing Raw Data
CSV files containing raw data (specified by a predefined file list,
CSV_FILE_LIST) are imported into the database.The ways data is processed and imported into the database.
The imported ways data is converted into a format suitable for further analysis (e.g., transforming OSM road network data into custom “ways” tables).
Enhancing the Database with SQL Functions
Essential SQL functions for querying and processing the data are added to the database.
This includes utility functions for geospatial data transformations and advanced query support.
Municipal Data Creation The
create_municipal_registerfunction creates a table containing all German municipalities and cities, serving as the foundation for multiple processes:Grid Generation: The PLZ code (Postleitzahl) defines areas for grid creation.
Building Dataset Import: The AGS (Amtlicher Gemeindeschlüssel) is required for linking municipal data with building datasets (see Grid Generation).
Area Classification: The Regiostar class is necessary for categorizing municipalities, enabling accurate analyses (see Classification of Pylovo Grids).
Additional hints
Hint
If you are working on Windows, we recommend using the Windows Subsystem for Linux (WSL) for the setup and to run the scripts.
To avoid path conflicts run all scripts from the directory root or setup your IDE running configuration accordingly.
As it appears within the repository make sure to exclude your virtual environment directory from version control and from your IDE project.
Our default spatial reference system for geographic data is EPSG:3035 (meters - LAEA Europe). OSM-Input data are often given in EPSG:3857 (meters - web maps). The pandapower networks are per default generated in EPSG:4326 (lon/lat - world). Be mindful of these different reference systems.
Explore more materials
For deeper understanding of the tool and the results you can…
…follow the documentation to generateo your first synthetic grid with pylovo Generate Synthetic Grids)
…go through the jupyter notebook tutorials.
…after generating grids open the QGIS file to directly visualize the data from your database with the predefined layouts (see QGIS Visualisation).
…read our publication (see Futher Reading) to understand the methodology in more detail
Optional steps
If you want more control over your input data follow instructions below:
(Optional) Preprocess transformers from OSM data
By default the database is populated with preloaded data of transformers in Bavaria, which are directly available
in the repository: raw_data/transformer_data/fetched_trafos/2145268_*.geojson.
If you want to fetch up-to-date data from OSM upon setting up the database with runme/main_constructor.py, delete
the raw_data/transformer_data/processed_trafos/*_trafos_processed.geojson file before running the script.
Pylovo will then know to fetch new data before importing it.
It is not necessary to delete raw_data/transformer_data/fetched_trafos/2145268_*.geojson.
Pylovo will fetch new data from OSM even if they are there, since the processing part afterwards takes much longer.
If you want to fetch up-to-date data upon running runme/main_constructor.py from a different area
then change the RELATION_ID in src/data_import/import_transformers.py to the relation ID
of the desired area.
Note
Processing transformer data can take around 50 minutes for entire German states.
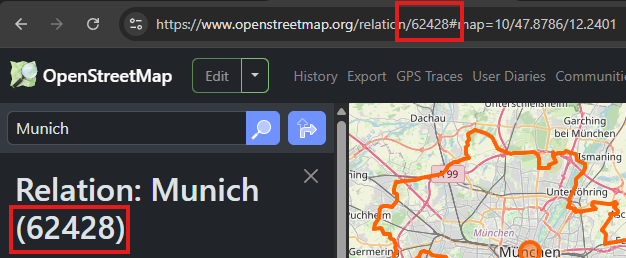
How to find desired relation ID
Go to OpenStreetMap.
Search for the desired location (area). For example: “Munich”.
Select the area from the list of results.
Copy the relation ID from the URL (after relation/) or copy it from the left sidebar (usually between brackets).
URL example: https://www.openstreetmap.org/relation/62428
Sidebar example: Relation: Munich (62428)
How to add more transformer data after database has already been constructed
To add more transformers from different areas after runme/main_constructor.py has been run, i.e. the database
has been constructed, simply run the runme/import/import_transformers_via_relation_id.py
script as shown in the example below:
$ python -m runme.import.import_transformers_via_relation_id --relation-id 62611
Selected relation ID: 62611
Corresponding area: Baden-Württemberg
Do you want to continue? [Y/n]
How to configure transformer processing
Open the src/data_import/import_transformers.py file. At the top, there are constants you can change: AREA_THRESHOLD, MIN_DISTANCE_BETWEEN_TRAFOS, VOLTAGE_THRESHOLD, and EPSG.
The script
runme/import/import_transformers_via_relation_id.pyis for running from the terminal directly and fetches GeoJSON files form the Overpass API. (saved inraw_data/transformer_data/fetched_trafos)Then it imports the files, transforming the geodata according to the EPSG projection to calculate distances and areas. Transformers can be points or polygons.
First, any transformers that overlap are deleted. This often occurs in “Umspannwerke” (HV transformers) where multiple tags exist for the same location.
Second, all transformers larger than the
AREA_THRESHOLDare deleted. LV transformers are either points or have smaller dimensions.Finally, the processed data gets saved (into
raw_data/transformer_data/processed_trafos) and inserted into the database.
What do the queries do that fetch transformer data?
They can be found in raw_data/transformer_data.
Assuming Bayern is selected:
substations_query.txt: The query searches for the keywords “transformer” and “substation” in the area “Bayern.” Substations from “Deutsche Bahn” as well as “historic” and “abandoned” substations are excluded. This query yields around 22,000 results. More information about transformer locations can be found on OpenInfrastructureMap.
shopping_mall_query.txt: The query searches for all places tagged with keywords indicating that nearby transformers do not belong to the LV grid (for example, “shopping malls” are likely directly connected to the MV grid). Other filters include land use related to the oil industry (e.g., refineries), power plants (e.g., solar fields), military training areas, landuse “rail,” landuse “education,” and large surface parking.
Make any changes to the Overpass queries that you see fit.
(Optional) Preprocess ways from OSM data
Use the following steps if you want to add more ways in addition to the default Bavarian ways provided with the public_2po_4pgr.sql file and set from main_constructor.py:
Connect to the database via localhost.
Download the OSM street networks you require from http://download.geofabrik.de/.
Download Osm2po-5.3.6 from https://osm2po.de/releases/.
Note
It must be version 5.3.6. This guide does not work with later versions.
Extract the downloaded zip file.
Open the
osm2po.configfile in the extracted folder and ensure the following lines are set correctly (lines starting with#are commented out): - Line 59:tilesize=x- Line 190: comment out.default.wtr.finalMask = car- Lines 222-231: ensure onlyferryis commented out - Line 341: must not be commented out, or the SQL file will not be generated.Open a terminal and navigate to the
Osm2po-5.3.6folder. Execute the following command:
 java -Xmx1g -jar osm2po-core-5.3.6-signed.jar prefix=public "C:/Users/path/to/osm/file/osm_file_name.pbf"

- Replace ``C:/Users/path/to/osm/file/`` with the path to the Geofabrik file you downloaded earlier.
- Replace ``osm_file_name.pbf`` with the name of the Geofabrik file.
Execute pylovo’s
main_constructor.py. - Ensure theways_to_dbmethod is uncommented inmain_constructor.py. - The ways in the2po_4pgrtable will be inserted into thewaystable and can now be used by pylovo.
(Optional) Adjust SQL functions
Prewritten SQL functions are created by the main_constructor script, so you can skip this step if you are using that script. The constructor uses the postgres_dump_functions.sql file in the pylovo folder. If you encounter issues or want to add SQL functions, edit and run the following file:
psql -d pylovo_db -a -f "pylovo/postgres_dump_functions.sql"